Saturday, December 17, 2011

Glitter Makes Everything Better

I had a fabulous peacock-shade nail color on but sure enough after 2 days it was looking not-so-fab and lackluster (and even some nails chipped).

The dilemma? Take the polish off (which seems so wasteful after only a few days) OR keep rocking chipped polish.  Honestly, the latter pains me. (I'm so dramatic)

The solution? GLITTER! Good thing it's the holidays and you can get away with ridiculous and shameful amounts of glitter.

The result is a fun new color that extends the wear of your current polish, the glitter actually hides the chips.

Some Like It Haute by China Glaze


close-up of the different size glitter pieces.


I love it. And it turns out Kerri had the same idea on her nails! Except hers was Trophy Wife by Essie with the glitter on top.  Great minds think alike!

Have a glittery and Merry Christmas!

Sunday, November 13, 2011

Making New


If I had told myself 10 years ago that I would be buying THRIFTED clothes/shoes/books/household items on a REGULAR basis when I was in my (upper) 20’s… I would have flipped a lid!  USED?  Eww!!

That’s for folks who:
  1. Cannot afford new
  2. Have no sense of taste
  3. Are hippies ;)
Come on!  Why would I buy USED?  Great question… and I now say “why not?!”

I have had more fun searching out ‘lightly used’ items for a fantastic price than I have ever had after paying full price for a brand new original price item.
Something about knowing it’s ‘one of a kind’.  I won’t run into someone at a wedding wearing the same dress.  I won’t visit a friend’s apartment to discover they have the same mirror in their bathroom or same piece of artwork on their wall.  And what a great sense of satisfaction when showing off my new item!

If I shared with you all of my amazing finds this blog post would be so long you’d never read it, so today I will just show you my most current discovery and thus latest project!

I have been fighting with a trouble wall in our living room for quite some time.  It sits adjacent to a wall with a giant photo collage.  And it sits opposite of a clementine orange accent wall.  I needed something just the right size and just the right color.

I was really hoping to find a piece that had a nice frame to finish it off as well.

While visiting my favorite thrift store a few weeks ago I did a stroll by the mirrors and artwork.  I was hoping that I might be able to find something the right size for my space so I could re-finish it my own style.


Matthew cringed when he saw what I came home with!  This bad boy measures 32”x50” (great size!) and has a beautiful frame with a linen matting.  I hung it on the wall to ensure it was a good fit for my space.


Over the next week and a half while I started thinking about what I wanted to do with it I had a lot of funny comments from friends ranging from: “Wow… is that new?” to “Interesting,… that’s not really what I would picture as your style!”… basically all hints at why in the world did I buy it this thing and hang it on my wall??

Well I decided that what I needed in it’s place was some abstracty black, white and grey birch tree trunks.  I thought it would look fun and modern with a nice simple design.  I set out to work.  I popped the picture out of the frame so that I could change the gaudy gold look to a nice clean black to look more our style. 


I started by painting a coat of white for a primer


Then I did a nice background grey to set the scene


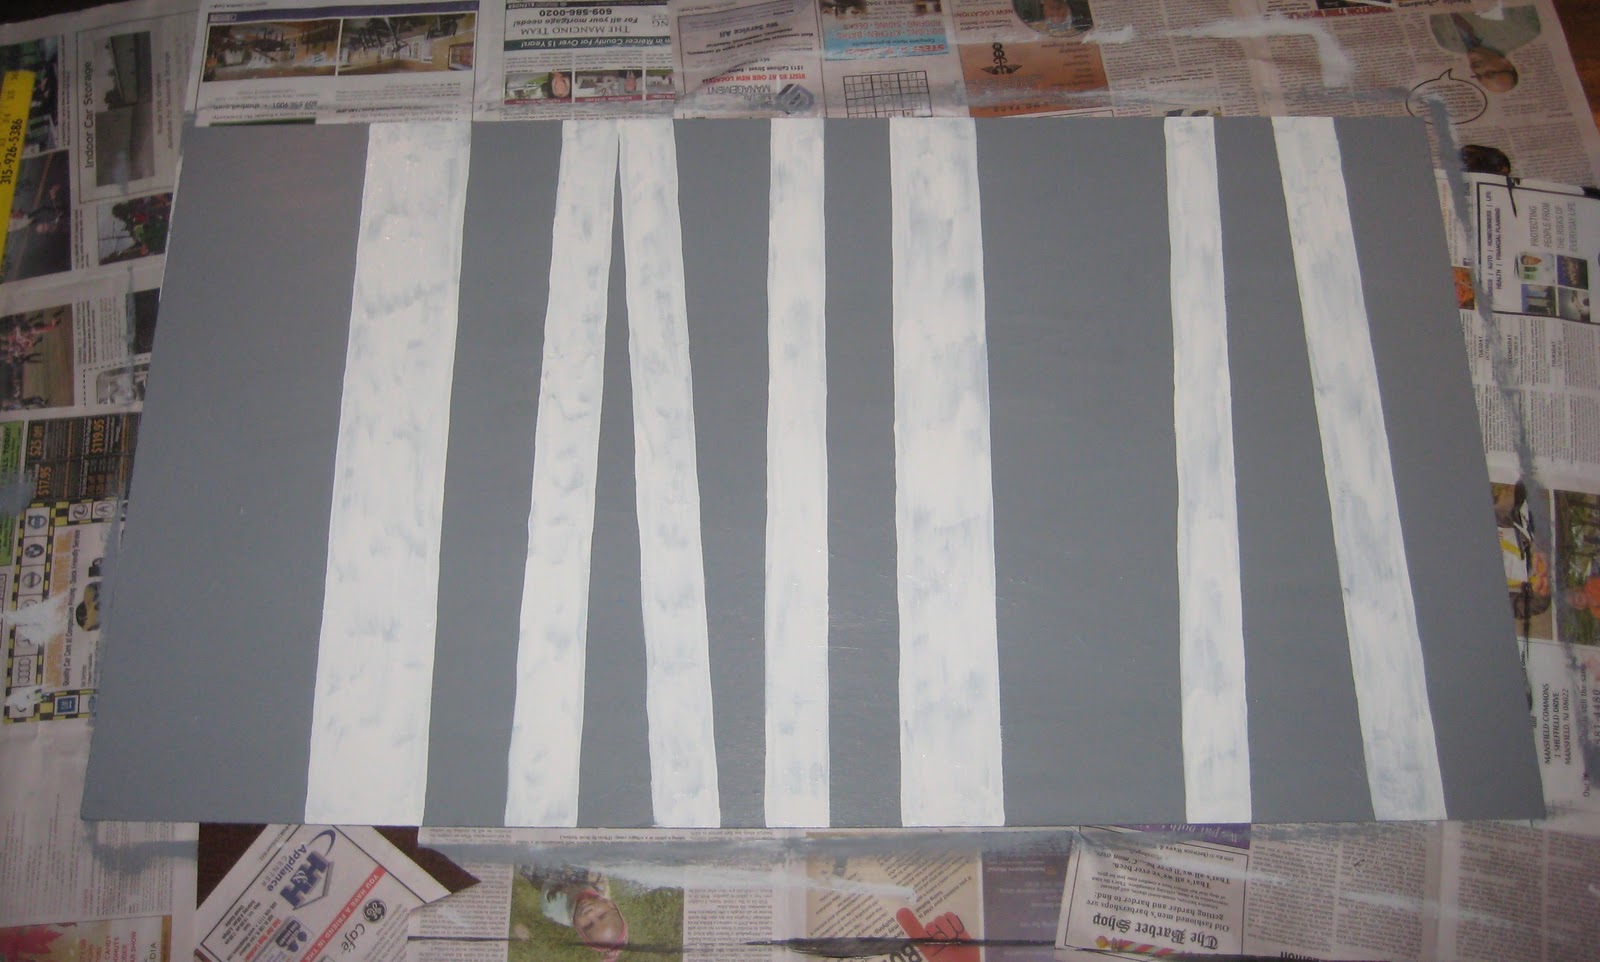
Then added a few white ‘tree trunks’


Added some black details


And popped her in my freshly painted black frame


VOILA!  It’s a finished piece.  We love it!
…. Or do we?  We sat on it for a few days and it’s not that we don’t like it…. It’s just that we want to love it!

Ok… so back to the drawing board… I think the problem was we like COLOR!  And that side of the room is already lacking in color with the black and white photos, the plain couch, etc…

I got the primer out and painted over the birch trees:


Then while poking around online I discovered this fabulous retro Dunkin Donuts logo.


It has just the right color for our room.  Matthew is OBSESSED with DD.  And to top it all off I actually “owed” him a piece of DD artwork after I hung up this bad boy in our kitchen:


So… I sketched it out and started painting:


And HERE is our finished piece!


Sure it took about a day and a half of painting all together, but here’s how the break down looks for the money we actually spent on it:

Old painting: $24.95
Primer: already had in basement
Paint: already had in basement
TOTAL: $24.95

For some inspiration from others click below:

Friday, November 4, 2011

Naan pizza


 A quick weeknight meal...

Kerri's been on the naan pizza train for awhile but I've only recently come on board. Now, it's one my go-to meals during the week.  I love it because it's quick, delicious, and looks fancier than it really is. 

Preheat oven to 400F.
Spread garlic pesto on the naan. Layer fresh sliced mozzarella and tomatoes (heirloom if it's available).  
Keep in the oven until all the cheese is gooey and bubbly. (10 minutes or so)


Top with fresh arugula and freshly ground pepper and enjoy!


The beauty of naan pizza is that you can put whatever toppings you want.  I've tried it marinated artichokes, diced seasoned canned tomatoes, prosciutto.

What will you put on your naan pizza?

Wednesday, October 26, 2011

Organization=Happiness

Today I am going to talk about organizing our stuff and CLEANING house!

A few weeks ago I attacked my upstairs bathroom.  I’d have to say it’s one of my dirty little secrets since no one other than Matt and I see that room.  It’s really crazy to see how my beauty supplies had exploded.  I closed the door on them and suddenly they all had little beauty supply babies just sitting there collecting dust. 
A shampoo bottle with just ½ inch left in the bottom (because I had bought a new one to replace it and didn’t have the self control to wait until I finished that last ½ inch before I opened the exciting new bottle!), a hair-spray I bought but didn’t like the smell, a container of loose powder with a cracked lid that wouldn’t stay on, some really ugly green eye-shadow that for some reason I thought I could pull off…  What were all these things doing up here? 
That’s when I decided to trick myself:  I said “we’re moving… this stuff just has to go!”  Oh dear!! Do you really want to pack all this stuff in boxes, then move it and unpack it again to just have it sit there and collect dust? What a waste. I shall keep just the basics that I use every day, plus a few extra-fun items that I like to have for special occasions. (If you know me you know I’m not actually moving any time soon!  This was simply a trick! And please don’t start spreading rumors… because it just ISN’T true!)

Anyways… no pictures of that project.  But that was just the beginning.

A few days after I cleaned out my upstairs bathroom a disaster happened!  Matthew and Jersey (my cute puppy) were playing like crazy boys upstairs.  They do this thing where they run back and forth and back and forth and chase each other and jump and wrestle and it sounds like an earthquake coming from upstairs.
Well in the middle of this came a huge CRASH!  I ran upstairs to see what was going on and this is what I find:


(I can't help but notice how cute he looks sitting there next to his mess!)
Jersey somehow managed to catch his back hip on the side of our bookshelf and it tore the side off causing all the books to come tumbling down.  Seriously?  How is that even possible?  Well obviously it is possible.

So for the past few weeks we have been walking around piles of books in our bedroom because we didn’t have another book shelf to put them on.  Ugh! 

I decided that since we live in such a small house and space is so valuable I’d rather not replace the book shelf with a new one in the bedroom.  Instead I wanted to combine all the books on the floor with the books in our office downstairs.  We have two nice white book shelves that came with the house that are plenty big for only 2 book owners to have their books on!

And so the project begins… Here is our book shelf downstairs before I started clearing it off and organizing it.


And here is our book shelf now:  It took only about 1.5 hours total to bring the books down, dust, and re-organize.  And what a difference!


I went with the color blocking to make it look less cluttery! ;)  And I even had enough room to move some of the photos up top down to shelves.  My other half still wanted those two big things up top though for now! ;) 

One of my tricks for having such colorful spines was taking the sleeves off the books!  So many sleeves are just white/black boring colors:

(and yay!  I love to recycle things!)

Check out how beautiful the spines with no sleeves on:


It's pretty amazing how much less stressed I feel walking through the bedroom now with no books to step on!  And it's also pretty funny how each time I'm in the office I take an extra moment to stop and smile at my well done job! :)

Ok friends... now it's your turn!  Take 1.5 hours this week to organize something that you've been putting off!  What will it be?

Tuesday, September 20, 2011

Fall into COLOR!

It's so hard to believe that fall is almost here.  Another summer has come and gone so quickly!
Goodbye flip flops. :(  Goodbye tank tops. :(  Goodbye iced tea. :(  Goodbye sunburned nose. :(

I want so badly to embrace autumn and really appreciate it for the beautiful season that it is. 
-Lovely blue skies with white puffy clouds. 
-Warm apple cider to keep your hands warm.
-Oranges and yellows (two of my favorite colors!) in the trees.
-Pumpkins on front porches.
-Lots of delicious home made baked goods.
-Spooky hay rides with friends.

This fall I decided (with the help of a friend!;) that I needed to spruce things up a bit to kick of the season by choosing a signature color for myself!  Therefore preparing myself for the cold days to come!
Going shopping always seems to do the trick when I need a pick me up!  (what woman doesn't that work for!?)

I chose mustard for my signature color.
(it was time to take a break from all of my orange and green!)

So here's what I have collected over the past few weeks:


1. Thrifted cardigan $3.95
2. Owl necklace $2.80 (forever 21)
3. Seude shoes with acorns (anthropologie with a gift card from my birthday!)
4. Thrifted J. Crew satin belt with feathers and rhinestones $8.00

Don't worry friends!  I'm trying not to wear all 4 together every day.  I'm doing my best to be subtle and appreciate the small pops here and there as I move toward autumn! (sometimes I have a hard time being subtle!)

So go for it! Pick a signature color for your fall wardrobe! :)

Thursday, September 1, 2011

Honesty is the Best Policy

It is rare to see a clear dining room table in my house.

Let's discuss how to have a simplified life.

I think the key to having a simplified life is to be brutally honest with yourself.   I have a tendency to hang on things because I don't want to be wasteful.  I think I'll be able to make use of x,y, or z sometime in the future.  But honestly, I probably won't wear those pants, or those shoes, or finish that craft project.  And the sooner I can come to terms with that reality, the sooner I've be able to donate or sell that item and declutter my life. 

Every item that takes up room in your house requires energy- whether it's to maintain or whatever.  I learned from this blog that everything in your house should either be useful or beautiful.  Everything else is clutter.  Less clutter in your life = more energy for yourself.

More often that not, we are not capable of being this honest with ourselves. That's when good friends become invaluable, when they are willing to create an intervention in your life!

So my goal for this fall is to be brutually honest with myself and clear out all the things that are not beautiful or useful out of my life.  The result?  To have a zen-like home that doesn't require crazy maintenance.  Practically speaking, I'm hoping to have an easier time getting dressed in the morning because I'll only own things that fit and look good.  Secretly I'm hoping to make a buck or two by selling stuff I don't use.  (For example, I have a pair of Prada shoes that I got for a fraction of the original price.  I keep thinking that I'll wear them- but HONESTLY, my feet are too big for them post-pregnancy and they're too fancy for my life.  It's time to say good-bye.)

It's going to hurt.  I know it is.  There are things that I want to keep (like my Northface messenger bag) that I have no good reason to keep.  Just need to suck it up and do it.

I encourage you all to be honest with yourselves too!!

Thursday, August 18, 2011

VORTEX changed our lives!


Ok friends! This is the post we've all been waiting for!

Last summer we discovered this amazing hair dryer at none other than Target. To the untrained eye it looks the same as every other hair dryer sitting on the shelf. In fact if you go out wanting to find one for yourself there's a good chance you will overlook it at first. It doesn't stand out. It doesn't cost much. (24.99 in fact) The display does it no justice.

When you do finally find it sitting amongst the boring regular hair dryers and bring it home you will take it out of the box to see this:


One of the attachments is a clear cylinder shape.
*This is where the magic happens*


INSTRUCTIONS:
1. Start with damp clean hair
-I usually let mine air dry a little while I do my make up first
2. VORTEX AWAY!!
-With the blow dryer on the hottest/highest setting start inserting sections of hair into cylinder
-I usually have about 6 or 7 sections for my whole head
-Move the cylinder up and down the section of hair until it is dry and then use the cool shot button to set the curl
-If desired spritz with hair spray for a good hold
3. Let your dreads cool completely
4. Shake them out with your fingers or a brush if desired
5. ENJOY beautiful beachy waves for the entire day (sometimes even two!)

FYI- This is only our first post on the VORTEX... there will be many more.
It's time for you ladies to start submitting photos of your best vortex day ever! ;)

Saturday, August 6, 2011

Guest in the house!


Guest blog time! Hi, I'm Megan, Kerri's sister-in-law! Kerri asked me to blog about a new piece of workout gear that I've fallen in love with, so here goes!


My favorite routine at the gym is a 45 minute spinning class followed by an hour of Zumba. As you may imagine, this results in a great deal of what I like to call "raining." Sounds a little classier than "sweating to death." A few months ago I had purchased a weird, huge headband that, if it starts to slide down, starts to look somewhat bank robber-ish... it does its job but it does not do it attractively.

I started searching for cute sweatbands and quickly found Sweatybands... I initially wrote them off because those types of skinny headbands all pop off my big Irish head almost immediately (even when secured with clips.) But then I saw "OMG... they don't slip!" in big letters on the website and started reading the testimonials on the site. The underside of the band is made of velvet which helps grip your hair (and absorb "rain") and there's a small strip of elastic so they fit snugly. There are dozens and dozens of pretty styles to choose from, as well! I picked out a cute black and white polka dot one and a pretty purple design and I just love them! I tested them out on a few walks and then it was time for the head-bobbing, hair-whipping spinning/zumba combo. You guys, it didn't budge! It was awesome! It did a really nice job of absorbing most of the sweat and channeling any excess to the back of my head... nothing is more annoying than drips running down your forehead!

Here are some pictures that my dog Pepper snuck into, I just have no idea how that happened! Oh, another benefit of the Sweatybands is that because they are pretty tight, they sort of give you that 60's hair bump without any of the teasing or hairspray. All I did was vortex (which Kerri and Lina should be blogging about very soon!) and then take a nap... Sweatybands can do it all!!!!


A very special thanks to Megan for being our guest! I don't mean to brag or anything... but she's kind of a big deal: http://megandailor.com/


Wednesday, August 3, 2011

Problem solved!

THE SITUATION
One of my favorite dresses....ruined by the moth holes.


THE PROBLEM
Tailor said mending the holes would draw more attention to them because it would pinch in the fabric. damn


THE SARCASTIC REMARK
I said, "What should I do? Buy a patch? (and by patch, I meant a Girls Scout badge, like the one I got for baking).  Tailor, with a serious face, said "yes".


THE GLIMMER OF HOPE
Off I went to the fabric store, praying that I wouldn't just find the patches that I used to sew on my denim vest back in the 80's a la Debbie Gibson.  I found these instead!


THE SOLUTION
I placed one patch strategically over the two holes and placed the other patch on the higher on the opposite side to bring some balance to the new visual interest on the back of my dress.

cue the choir of angels
ahhhhhhhhhhhh!!!!!!!!


ELATION!
I love the fact that I don't have to say any tearful good-byes to my dress. And I love that it only cost me $6.99.  It was quite a simple fix.  It took 5 minutes to buy it at the store and 5 minutes to iron it on.  It probably took more time to take all the photos and write about it.


LESSON LEARNED
Instead of trashing something, try to think outside the box to salvage it.  It might end up better than it started.

I leave you with the front view so you have an idea of what I was trying to save.  Good luck to you all who want to put a little sweat equity into your favorite things!

Saturday, July 23, 2011

Thrifty Girl!

I just got back from a fun trip to Greene Street Consignment in Princeton. I was so excited about the deal I got that I felt I needed to share it with you!

First off: I think it's fair to say I am modest with my spending. I rarely splurge and try to make smart choices. I am more likely to spend money at Home Depot on paint for the house than I am to spend $50 on a new piece of clothing for myself.

Up until just recently I would always wear very inexpensive jeans. I would find them on sale at Old Navy or Gap.

A few months back one of my very good friends 'handed down' a few pairs of designer jeans to me. I have to say that I had no idea what I was missing out on. They seem to fit better and just be such a better quality product. I feel more confident when I wear them and I just feel good!

Before I share a picture of my new 'Lucky' jeans I wanted to pull out some dresses that I have bought over the past year and a half at both consignment stores and thrift stores. It's amazing what a unique and vibrant wardrobe you can build without spending much! :) I bought a few of these for only $4.95 and the most expensive was maybe $15.00 at the high end!


This is the first and hopefully last time I post a picture of my butt on the blog!! I just had to share that great 'Lucky' tag that I snagged for a mere $18.00. (keep in mind folks that Lucky Brand jeans run from about $99 to $250 brand new!) I know I will be wearing these for a long time even if I am the second owner! :)


(ps. that's my dog, Jersey, and our friends dog, Archie, standing by my butt shot! I had never tried to take a picture of my own butt before. It wasn't easy!)


Thursday, July 14, 2011

How to Not Waste Kale

Being a part of a CSA (community-supported agriculture) farm truly has its benefits.  There's something so deeply satisfying about getting food straight from the source. It's why something like apple-picking is so fun.  I love cooking with veggies that I know were just picked.

Problem is you don't know what you're going to get from that week's harvest.  Kale has not been my friend over the past few summers because it ends up rotting in my fridge.  But not this year!

Sausage Lentil Kale Stew
 from Katie Lee's Comfort Table
It starts off with this...


Simmers for an hour like this...


And then you eat it as this...


Super healthy for you because it's got tons of veggies. Got some heat from the andouille sausage.  Got some naughtiness from the bacon (which you saute the mirepoix from its rendered fat) and let's face it, because bacon makes everything better.

There you have it.  How to not waste kale. This will be a staple recipe from now on!

Tuesday, July 5, 2011

Summer Sangria

Over the 4th of July weekend we did something very nontraditional...

No beach.
No BBQ.
No swimming.
No fireworks.
No strawberry shortcake.

We went with our good friends to an IRISH PUB!
It was hard to believe that we didn't know about Dublin Square sooner! It's only about 10 minutes from our house!


http://www.dublinsquarepubs.com/bordentown/home/

It was a very authentic Irish Pub and Restaurant.
The bartender was even wearing a kilt!

And then, while sitting at the bar of an Irish Pub, I did something else very nontraditional...

I ordered sangria! And was blown away by how amazing it was. It's safe to say it was the best I've ever had!!

I got the details from my kilt-wearing bartender about how to make it at home.

So, here goes nothing!


I started with the amazing South African wine called 'jam jar' for only $8.99. (Is that not the cutest bottle??!!)

Then I cut up some fresh fruit.


Dumped it all together with some peach schnapps...
Add a splash of OJ or seltzer if you'd like!

And there you have it!

Easy.

Delicious.

Short Lived.

Happy Summer! :)