Showing posts with label home. Show all posts

Sunday, November 18, 2012

Junk + Love = Treasure

While out thrifting with some friends we came upon this ugly coffee table from the 1970's.  I didn't even notice it at first honestly.  But when my friend said she wanted to bring it home I was suddenly jealous!!  Like I missed out on some fabulous purchase!  Oh no.  (Not sure what my problem was)  
Anyway,... at the last minute while we were standing in line to buy it (for $7) she changed her mind and decided not to take it.  YES!  It was mine!  Ha ha.  
 I decided I wanted to transform this ugly coffee table into a bench.
First things first:  Paint WHITE.  (my trademark color these days)
 Next I went to Joann's to get some fabric to make a bench cushion.  Unfortunately all the fabric that I liked was over $20 a yard and I needed 2 yards.  Ugh.  Couldn't explain that to my husband.  Buying a $7 coffee table to transform and end up spending another $40+ on fabric alone.  Oiy.
I had no choice.  I had to make my own fabulous fabric.  I bought plain gray duck cloth for $5 per yard and this cute stencil for $1.99.
 Then I went to town!  How cute is this??

 Love!  :)
 Next I took my 3 inch foam that I had cut to size at Joann's ($10 after 50% off coupon)  And layered my $6 plywood on top.

 I wrapped the fabric nice and snug and used my staple gun.
 Ta Da!  :)  I am in love with it!  And an added bonus:  I didn't permanently attach the cushion to the bench, so if I need to use this as a coffee table again, no worries.  Just remove the top and we're good to go!
 Not the best picture, but just wanted to show how big it is!  I think I may use it for extra seating when my family comes for Thanksgiving! :)
Ok... so all the totals so we can make sure my $7 thrift store purchase was worth it:
Coffee Table- $7
Primer- already had!
Paint- already had!
Fabric- $10 ($5 per yard)
Stencil- $1.99
Wood Board- $6
Foam- $10
GRAND TOTAL=$34.99


Tuesday, June 19, 2012

The Importance of Pruning

No... this isn't a jungle. It's supposed to be my cute container garden.


Not much "contained" about this at all.

I knew my tomato plants were growing out of control.  But I kept procrastinating on pruning the plant.  Tonight, as we took a stroll around our neighborhood, I couldn't ignore it any longer. Started trimming...

Then I got on a roll...


As I was pruning, I couldn't help but to be reminded how important this practice is.  If you don't prune, not only will you have a horticultural hot mess but the fruit of the plant will not get as much nutrients and water because all the other branches of the plant are fighting for the same things.

Cutting off the branch without any flower buds or fruit

How true is this in our own lives?  Everything is competing for our time, money, resources, and energy.  If we don't prune the excess out of our lives, then the important "fruit" in our lives won't get the full benefit of our resources.  Tonight was a good reminder that I need to take the time and prune different areas of my life- whether it be clothes I don't wear to useless tv shows to household items I don't use.  That way I'm left with more time and energy to redirect to the important things in my life.

Here is the "after" shot:

Less jungle. More cherry tomatoes!

What can you prune in your life that would give way to more priorities in your life?

Tuesday, January 24, 2012

The Power of a LIST

Hello my long lost friends!
Sorry about the MIA status for a while there.  I have no good excuse. But, I'm back. :)

This post on list-keeping may seem super simple to some of you guys.  It may seem almost so simple that it's not necessary to even discuss.  But I am going to have to disagree.  I have found that once you have the right kind of list that works for you, it will change your life!

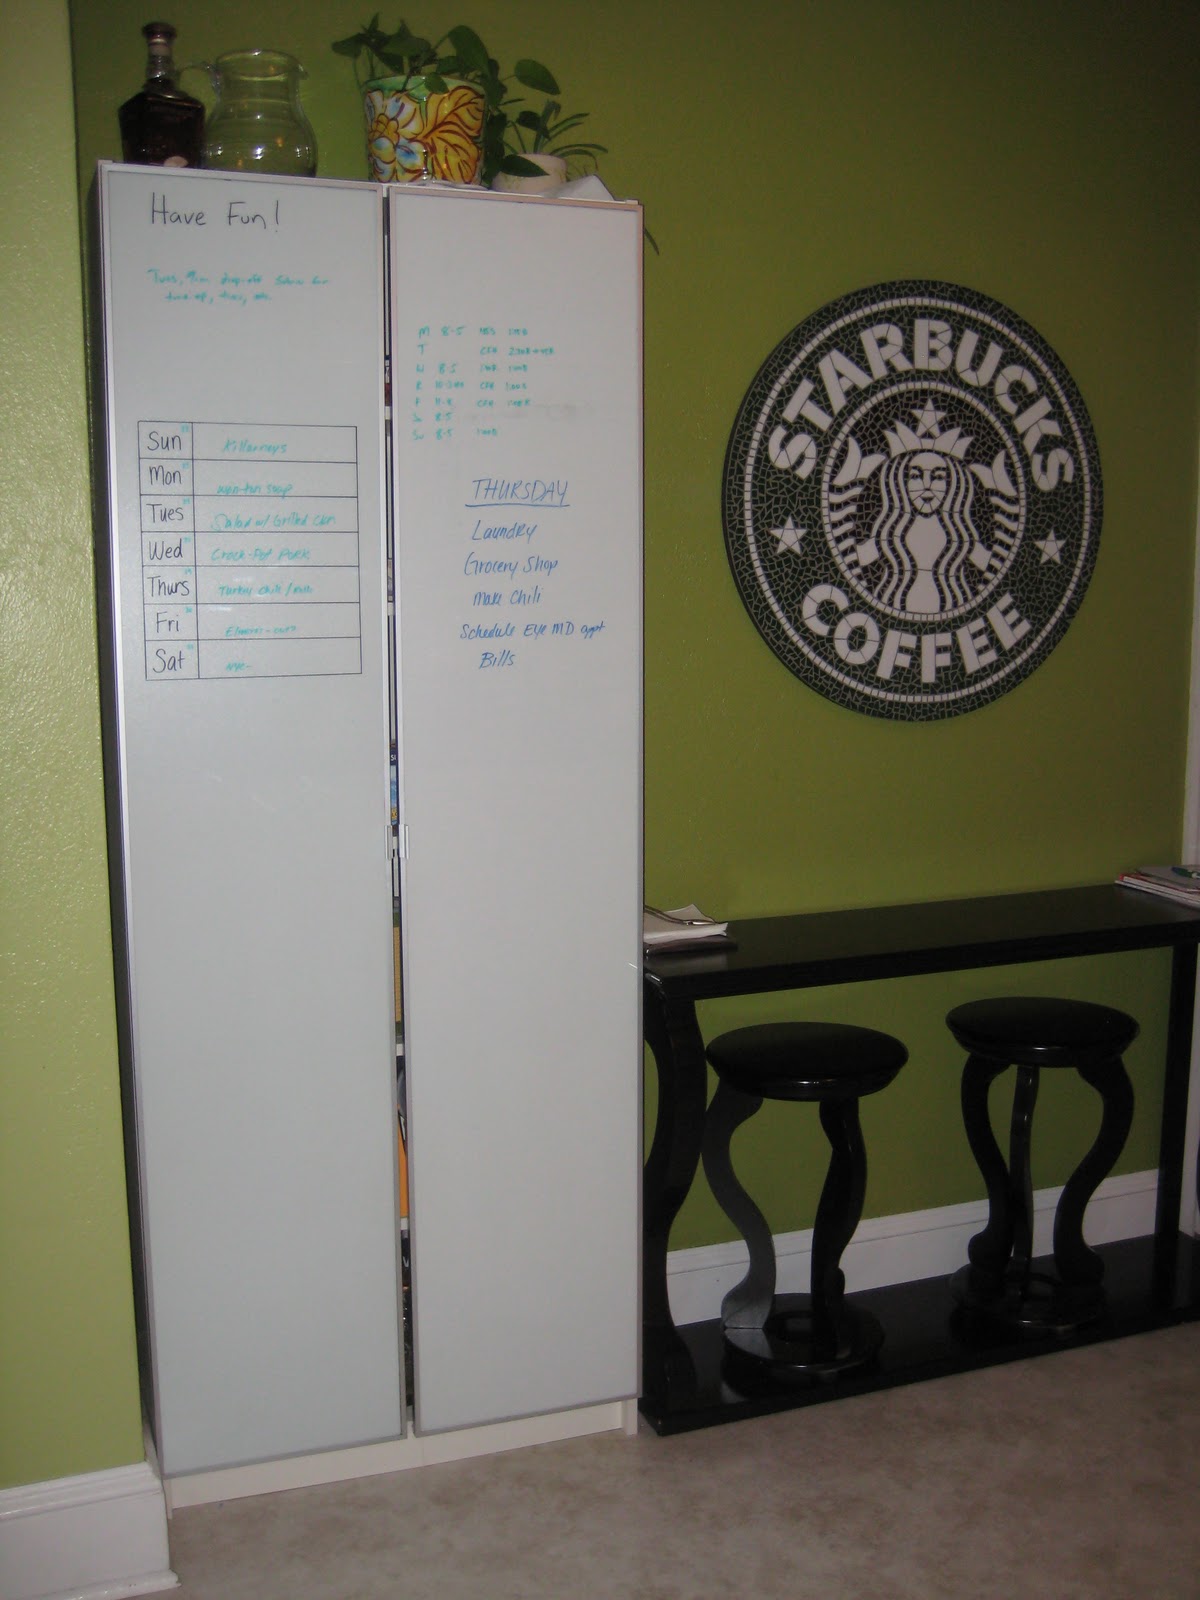
A few years back Matthew and I were looking for a cabinet to add space to our small kitchen.  We wanted something that didn't leave a huge foot-print and yet held a lot.  We totally lucked out when we found this fantastic tall cabinet from IKEA (of course!).  When we brought it home and set it up we realized that since the doors are made out of glass it's also the perfect surface for a giant message board.

So along with the occasional love note we leave for one another on it ;) this message board serves for the LIST keeper of any items that we need to share. 

We keep our menu plan for the week on the left hand side.
Our daily "to-do" list is on the right hand side.
And Matthew's work out schedule is on the top so that I know when/where to find him! :)


When we were visiting some friends this weekend we found that they have a very similar system that they share in their kitchen (sorry for the bad quality photos... I snapped them real quick on my phone).

On the coolness scale this chalkboard wall rates so much higher than our glass wipe board.
When they bought their house last year they decided to devote an entire wall in their kitchen to be their chalk board.  They keep two main lists going: One for upcoming projects and the other for their monthly overview.


Ok... now on to my personal favorite and the list keeper that truly changed my life
(and no, unfortunately apple is not paying me to say this!)

In November I got my first iPhone!  There are so many amazing things about it that I love so much!
But honestly I think my very favorite thing is one of the most SIMPLE features. 

Every iPhone comes preloaded with a little yellow app called "Notes"


When you click on it it brings you to a list of any "note" that you have started.
I personally don't use them for anything other than a place to keep all my lists. 

Before my iPhone I had a list on the refrigerator for groceries. 
...and a scrap paper list in my purse for groceries. 
...and a torn off piece of journal list by my bed for groceries.
...and a post-it note list in my work calendar for groceries. 
...and possibly another scrap paper list in my car for groceries. 

Then when I actually went to the store to buy groceries I had no idea what I needed because my lists were scattered everywhere!!!  I would end up buying things I didn't need and then forgetting things I did need. 
I was a hot mess.

Now when I think of something I should add to the grocery list I simply grab my phone.  It's the ONE thing that is ALWAYS with me.  When I'm at home.  In my purse.  When I'm in bed.  At work.  In my car.  It's always right there when I think of something to add to the list.


Some of the other lists that have been really helpful for me to have nearby are shopping lists, my personal wish list (for when someone asks me what I want for a birthday/Christmas and I would normally have no idea), Matt's wish list, upcoming jobs, things to remember to bring home when we travel and items to freecycle.

I'm sure every one's most important lists are different.
And everyone has their own style for what works best for their list-keeping.
But make a plan and start using your lists more efficiently today and it will make your life so much easier.

I also totally recommend this take on list-keeping if you're up for some more reading!


Sunday, November 13, 2011

Making New


If I had told myself 10 years ago that I would be buying THRIFTED clothes/shoes/books/household items on a REGULAR basis when I was in my (upper) 20’s… I would have flipped a lid!  USED?  Eww!!

That’s for folks who:
  1. Cannot afford new
  2. Have no sense of taste
  3. Are hippies ;)
Come on!  Why would I buy USED?  Great question… and I now say “why not?!”

I have had more fun searching out ‘lightly used’ items for a fantastic price than I have ever had after paying full price for a brand new original price item.
Something about knowing it’s ‘one of a kind’.  I won’t run into someone at a wedding wearing the same dress.  I won’t visit a friend’s apartment to discover they have the same mirror in their bathroom or same piece of artwork on their wall.  And what a great sense of satisfaction when showing off my new item!

If I shared with you all of my amazing finds this blog post would be so long you’d never read it, so today I will just show you my most current discovery and thus latest project!

I have been fighting with a trouble wall in our living room for quite some time.  It sits adjacent to a wall with a giant photo collage.  And it sits opposite of a clementine orange accent wall.  I needed something just the right size and just the right color.

I was really hoping to find a piece that had a nice frame to finish it off as well.

While visiting my favorite thrift store a few weeks ago I did a stroll by the mirrors and artwork.  I was hoping that I might be able to find something the right size for my space so I could re-finish it my own style.


Matthew cringed when he saw what I came home with!  This bad boy measures 32”x50” (great size!) and has a beautiful frame with a linen matting.  I hung it on the wall to ensure it was a good fit for my space.


Over the next week and a half while I started thinking about what I wanted to do with it I had a lot of funny comments from friends ranging from: “Wow… is that new?” to “Interesting,… that’s not really what I would picture as your style!”… basically all hints at why in the world did I buy it this thing and hang it on my wall??

Well I decided that what I needed in it’s place was some abstracty black, white and grey birch tree trunks.  I thought it would look fun and modern with a nice simple design.  I set out to work.  I popped the picture out of the frame so that I could change the gaudy gold look to a nice clean black to look more our style. 


I started by painting a coat of white for a primer


Then I did a nice background grey to set the scene


Then added a few white ‘tree trunks’


Added some black details


And popped her in my freshly painted black frame


VOILA!  It’s a finished piece.  We love it!
…. Or do we?  We sat on it for a few days and it’s not that we don’t like it…. It’s just that we want to love it!

Ok… so back to the drawing board… I think the problem was we like COLOR!  And that side of the room is already lacking in color with the black and white photos, the plain couch, etc…

I got the primer out and painted over the birch trees:


Then while poking around online I discovered this fabulous retro Dunkin Donuts logo.


It has just the right color for our room.  Matthew is OBSESSED with DD.  And to top it all off I actually “owed” him a piece of DD artwork after I hung up this bad boy in our kitchen:


So… I sketched it out and started painting:


And HERE is our finished piece!


Sure it took about a day and a half of painting all together, but here’s how the break down looks for the money we actually spent on it:

Old painting: $24.95
Primer: already had in basement
Paint: already had in basement
TOTAL: $24.95

For some inspiration from others click below:

Wednesday, October 26, 2011

Organization=Happiness

Today I am going to talk about organizing our stuff and CLEANING house!

A few weeks ago I attacked my upstairs bathroom.  I’d have to say it’s one of my dirty little secrets since no one other than Matt and I see that room.  It’s really crazy to see how my beauty supplies had exploded.  I closed the door on them and suddenly they all had little beauty supply babies just sitting there collecting dust. 
A shampoo bottle with just ½ inch left in the bottom (because I had bought a new one to replace it and didn’t have the self control to wait until I finished that last ½ inch before I opened the exciting new bottle!), a hair-spray I bought but didn’t like the smell, a container of loose powder with a cracked lid that wouldn’t stay on, some really ugly green eye-shadow that for some reason I thought I could pull off…  What were all these things doing up here? 
That’s when I decided to trick myself:  I said “we’re moving… this stuff just has to go!”  Oh dear!! Do you really want to pack all this stuff in boxes, then move it and unpack it again to just have it sit there and collect dust? What a waste. I shall keep just the basics that I use every day, plus a few extra-fun items that I like to have for special occasions. (If you know me you know I’m not actually moving any time soon!  This was simply a trick! And please don’t start spreading rumors… because it just ISN’T true!)

Anyways… no pictures of that project.  But that was just the beginning.

A few days after I cleaned out my upstairs bathroom a disaster happened!  Matthew and Jersey (my cute puppy) were playing like crazy boys upstairs.  They do this thing where they run back and forth and back and forth and chase each other and jump and wrestle and it sounds like an earthquake coming from upstairs.
Well in the middle of this came a huge CRASH!  I ran upstairs to see what was going on and this is what I find:


(I can't help but notice how cute he looks sitting there next to his mess!)
Jersey somehow managed to catch his back hip on the side of our bookshelf and it tore the side off causing all the books to come tumbling down.  Seriously?  How is that even possible?  Well obviously it is possible.

So for the past few weeks we have been walking around piles of books in our bedroom because we didn’t have another book shelf to put them on.  Ugh! 

I decided that since we live in such a small house and space is so valuable I’d rather not replace the book shelf with a new one in the bedroom.  Instead I wanted to combine all the books on the floor with the books in our office downstairs.  We have two nice white book shelves that came with the house that are plenty big for only 2 book owners to have their books on!

And so the project begins… Here is our book shelf downstairs before I started clearing it off and organizing it.


And here is our book shelf now:  It took only about 1.5 hours total to bring the books down, dust, and re-organize.  And what a difference!


I went with the color blocking to make it look less cluttery! ;)  And I even had enough room to move some of the photos up top down to shelves.  My other half still wanted those two big things up top though for now! ;) 

One of my tricks for having such colorful spines was taking the sleeves off the books!  So many sleeves are just white/black boring colors:

(and yay!  I love to recycle things!)

Check out how beautiful the spines with no sleeves on:


It's pretty amazing how much less stressed I feel walking through the bedroom now with no books to step on!  And it's also pretty funny how each time I'm in the office I take an extra moment to stop and smile at my well done job! :)

Ok friends... now it's your turn!  Take 1.5 hours this week to organize something that you've been putting off!  What will it be?

Friday, June 24, 2011

Thrift Store Chair


I have seen so many fun ideas about refinishing old chairs lately.


Since I am in the middle of re-decorating my office into a gray and yellow fabulous inspiration of a room, (ha ha... I'm trying at least) I decided to head over to my favorite thrift store in search of a new desk chair to add a pop of yellow.


When I came home with this $5 monstrosity, my husband was rather apprehensive!

I had some wood glue and screws in the basement to reinforce the bones.

I ran to Lowes and bought a $3.50 can of spray paint.

Then over to West Elm where I found this yellow and white dish towel for $9.00.


Not bad for $17.50, right?


And Voila!!